OneDrive (previously SkyDrive, Windows Live SkyDrive and Windows Live Folders) is a personal cloud file hosting, storage and sync service from Microsoft. In Windows 10, the OneDrive desktop app is installed and comes natively with the operating system. And if you sign into Windows 10 with a Microsoft Account (MSA), OneDrive is also enabled by default.
However, not everyone uses OneDrive. Some may prefer other similar cloud storage services such as Dropbox, Google Drive, Apple iCloud Drive, Box and many more. Or many may simply not using any cloud storage service or file hosting service at all, especially at computers used in businesses, corporations, enterprises, schools and educational institutions.
Unlike Windows 8.1, Windows 8, Windows 7 or earlier Windows operating systems, OneDrive desktop app is tightly integrated with Windows 10. OneDrive folder is in File Explorer’s navigation pane right from the moment you starting to use Windows 10. In fact, by default Windows 10 does not provide a way for users to uninstall and remove OneDrive app, whether it’s from “Programs and Features” of “Control Panel” or Windows Store. You simply won’t find any OneDrive entry to initiate the uninstallation process.
However, there are several ways available in Windows 10 to deal with OneDrive app, depending on whether you want to hide, disable, remove or uninstall the OneDrive. The tutorial provides all the options available with step-by-step guide.
Disable OneDrive Everywhere in Windows and Apps Completely
- Press Win + R keyboard accelerator to open Run dialog box.
- Type GPedit.msc and hit Enter or OK to open Local Group Policy Editor.
- Navigate to Local Computer Policy -> Computer Configuration -> Administrative Templates -> Windows Components-> OneDrive.
- In the right pane, double click on policy named Prevent the usage of OneDrive for file storage.
- Select the Enabled radio button.
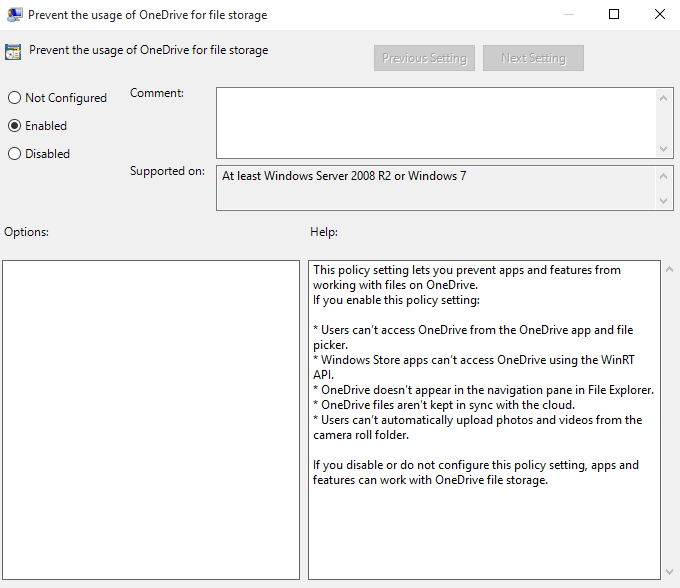
- Click or tap OK when done.
That’s it. OneDrive icon is hidden from Explorer, and OneDrive app is completely disabled and prevented from running, and access or work with files on OneDrive from any desktop apps or modern apps is blocked. For example:
- Can’t access OneDrive from the OneDrive app and file picker.
- Windows Store apps can’t access OneDrive using the WinRT API.
- OneDrive doesn’t appear in the navigation pane in File Explorer.
- OneDrive files aren’t kept in sync with the cloud.
- Can’t automatically upload photos and videos from the camera roll folder.
- Sign out and sign in again, or restart the computer.
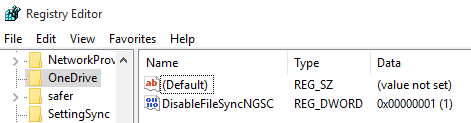
Registry Settings
The policy above is actually set a setting in Registry, which is useful for people who prefer to use Registry Editor. In addition, Windows 10 Home does not come with Group Policy Editor too.Here’s how to use Registry Editor to turn off OneDrive everywhere completely:
- Press Win + R keyboard accelerator to open Run dialog box.
- Type RegEdit.exe and hit Enter or OK to open Registry Editor.
- Navigate to the following registry key:HKEY_LOCAL_MACHINE\Software\Policies\Microsoft\Windows
- Right click on Windows and select New -> Key. Name the new key as OneDrive.Note: If OneDrive key already exists, skip this step.
- Right click on OneDrive registry key, and select New -> DWORD (32-bit) Value. Name the new value name asDisableFileSyncNGSC
- Set the data for DisableFileSyncNGSC registry value as 1.
 Note: DisableFileSync registry value only works in Windows 7, Windows 8 and Windows 8.1 and does not work in Windows 10.
- Close Registry Editor.
- Sign out and sign in again, or restart the computer.
Hide and Remove OneDrive from Navigation Pane of Windows Explorer
If you just want to remove the OneDrive entry in the navigation pane (also known as side panel or folder tree) in the File Explorer, or the OneDrive folder still exists in File Explorer after disabling OneDrive, follow the guide to remove OneDrive from Windows 10 File Explorer Navigation Side Panel.
Complete Remove and Uninstall OneDrive
It’s impossible to manually uninstall and remove OneDrive in Windows 10 by the step-by-step guide below. Run the commands to be executed in the process below in an Administrator Command Prompt.
Uninstall OneDrive
- Terminate any process of OneDrive by running the following command:
taskkill /f /im OneDrive.exe
- Uninstall OneDrive app by running one of the following command:In 32-bit Windows 10 (x86):
%SystemRoot%\System32\OneDriveSetup.exe /uninstall
In 64-bit Windows 10 (x64):
%SystemRoot%\SysWOW64\OneDriveSetup.exe /uninstall
One you ran the above command, OneDrive desktop app is uninstalled completely and cleanly. Most of the time, no progress bar nor confirmation dialog is shown. However, when you search for OneDrive, the app no longer be found.
Cleaning and Removing OneDrive Remnants
However, as OneDrive is a cloud storage service which is dealing with user data, there are remnants and leftovers from OneDrive app that are still available on the system as uninstallation does not remove user data, most prominently been the OneDrive folder. Run the commands below to clean up those remnants by deleting OneDrive related folders and their contents:
Important
Make sure that the following folders no longer contain any user data before proceeding with the following commands.
rd "%UserProfile%\OneDrive" /Q /S
rd "%LocalAppData%\Microsoft\OneDrive" /Q /S
rd "%ProgramData%\Microsoft OneDrive" /Q /S
rd "C:\OneDriveTemp" /Q /S
Delete and Remove OneDrive in File Explorer Folder Tree Registry Key
OneDrive has registry keys which add itself to the Navigation Pane of File Explorer in Windows 10. After uninstalling OneDrive, these registry keys are orphaned, and can be removed.
REG Delete "HKEY_CLASSES_ROOT\CLSID\{018D5C66-4533-4307-9B53-224DE2ED1FE6}" /f
REG Delete "HKEY_CLASSES_ROOT\Wow6432Node\CLSID\{018D5C66-4533-4307-9B53-224DE2ED1FE6}" /f