Raspberry Pi is a useful embedded computer that can be used for many things including powering informational dashboards. There are several ways to achieve this with varying complexity however In this tutorial, we will show how to utilise a Raspberry Pi as a Dashboard Controller in a simple straight forward manner. We are using a Pi 4 revision B however the below has been tested on Pi 3b revisions.
The Pi needs to be configured properly in order to satisfy the following needs:
- The screen should be fully filled with the view
- After booting, the predefined screen should be loaded automatically
- The screen should not sleep after some period of time
- The mouse cursor should not be visible in the screen
- Menus and the taskbar should not be visible
- After an unclean reboot (i.e. after power outage), there should be no browser warning about the unclean shutdown
- It should be possible to connect to the device remotely to reload or change the view
What you need
- RaspberryPi
- 8GB microSD card (preferably with microSD -> SD adapter)
- (preferably) RaspberryPi case
- DC charger with 5V output of 2 Amperes and with USB C jack (very common nowadays, as it is used for charging smartphones and tablets).
- USB keyboard for configuration. A mouse is not necessary
Step 1 – Update your Raspberry Pi
Once you have setup the Raspberry Pi and are presented with a desktop screen we need to update the device The following commands are to be run in a Terminal:
sudo apt-get update && sudo apt-get upgrade -y && sudo reboot
Its also a good idea to update the firmware on your Pi:
sudo rpi-update
Once the firmware is updated reboot the device for the next step.
Step 2 – Disable screen timeout
To prevent the screen going blank you need to disable screen timeout. In the latest versions of RaspbianOS, this is now an option that can be set in the GUI.
Click Start>Preferences>Raspberry Pi Configuration and select the Display tab:
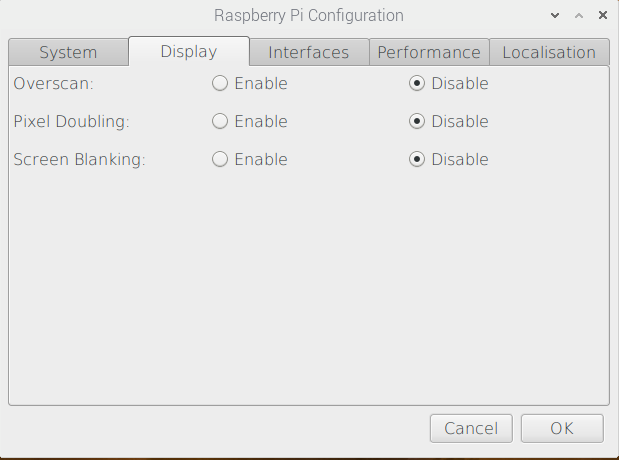
From here, disable Screen Blanking and click ok. now reboot your Pi again.
Step 3 – Install Unclutter
Unclutter is a tool to disable the mouse being viable when there is no input. Simply install with the following command in Terminal:
sudo apt-get install unclutter
Step 4 – Create Autostart for Chromium Browser with LXDE
Create two files in /home/pi/.config/lxsession/LXDE-pi – autostart and desktop.conf this can either be by using nano or creating via a ssh tool like WinSCP.
Add the below to autostart and save the file. You can place the URL of your dashboard after the –incognito flag:
@lxpanel --profile LXDE-pi
@pcmanfm --desktop --profile LXDE-pi
# @xscreensaver -no-splash
@point-rpi

@xset s off
@xset -dpms
@xset s noblank
@unclutter

@chromium-browser --noerrdialogs --kiosk --disable-infobars --incognito http://URL-GOES-HERE
Add the contents of desktop.conf and save the file:
[Session]
window_manager=openbox-lxde-pi
disable_autostart=no
polkit/command=lxpolkit
clipboard/command=lxclipboard
xsettings_manager/command=build-in
proxy_manager/command=build-in
keyring/command=ssh-agent
quit_manager/command=lxsession-logout
quit_manager/image=/usr/share/lxde/images/logout-banner.png
quit_manager/layout=top
lock_manager/command=lxlock
terminal_manager/command=lxterminal
launcher_manager/command=lxpanelctl

[GTK]
sNet/ThemeName=PiX
sNet/IconThemeName=PiX
sGtk/FontName=Roboto Light 12
iGtk/ToolbarStyle=3
iGtk/ButtonImages=0
iGtk/MenuImages=0
iGtk/CursorThemeSize=18
iXft/Antialias=1
iGtk/AutoMnemonics=1
iGtk/EnableMnemonics=1
sGtk/ColorScheme=selected_bg_color:#4d4d9898f5f5nselected_fg_color:#ffffffffffffnbar_bg_color:#ededececebebnbar_fg_color:#000000000000n
sGtk/CursorThemeName=PiX
iGtk/ToolbarIconSize=1
iNet/EnableEventSounds=1
iNet/EnableInputFeedbackSounds=1
iXft/Hinting=1
sXft/HintStyle=hintfull
sXft/RGBA=rgb

[Mouse]
AccFactor=20
AccThreshold=10
LeftHanded=0

[Keyboard]
Delay=500
Interval=30
Beep=1

[State]
guess_default=true

[Dbus]
lxde=true

[Environment]
menu_prefix=lxde-pi-
Reboot the Pi and after a few moments the display should now show the URL dashboard you enetered in autostart.
To rotate more than one dashboard page
The easiest way to achieve this is by installing Revolver – Tabs from the chrome webstore. this can be done by closing down the dashboard instance of Chromium by pressing CFRL-F4 then opening the Chromium Browser from START>Internet>Chromium Browser and clicking the link above.
You’ll need to change settigns within Revolver Tabs, notably rotation time in seconds, auto start and optionally reload. If you have Reload enabled, you can prevent tabs reloading by specifying their URL’s. Remember to click save.
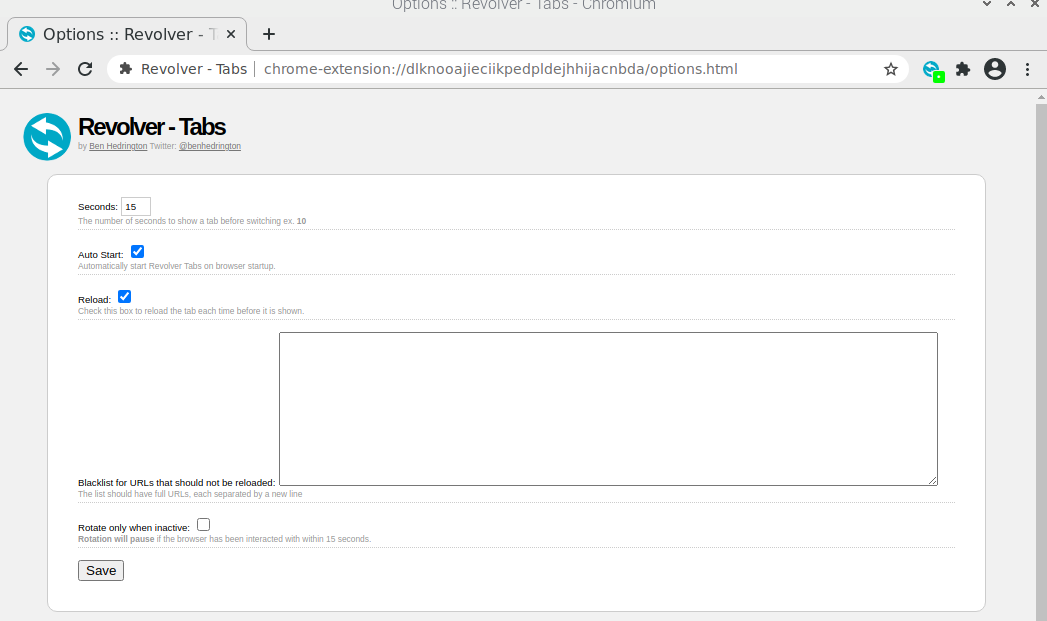
As we loaded Chromium in Incognito, you need to enable Revolver Tabs for incognito mode is Google chromium extensions settings.
Once setup second and subsequent URLs you have entered in autostart will automatically rotate. subsequent URLs can be added with a space in between them:
@chromium-browser --noerrdialogs --kiosk --disable-infobars --incognito http://URL-1 http://URL-2 http://url-3