Get rid of pesky Google Update services on your PC/Server after installing Chrome or several other Google type apps:
@echo off
sc stop gupdate
sc delete gupdate
sc stop gupdatem
sc delete gupdatem
This should remove the Google Update services.
Get rid of pesky Google Update services on your PC/Server after installing Chrome or several other Google type apps:
@echo off sc stop gupdate sc delete gupdate sc stop gupdatem sc delete gupdatem
This should remove the Google Update services.
This article outlines a few tips to be mindful of when performing an in-place upgrade from Windows Server 2012 to Windows Server 2012 R2.
Without wishing to be verbose on this one, the simple answer is that it appears to be a bug / limitation / “feature” of the iSCSI Target component of Server 2012. It was not a client issue.
The following core features will not be available after upgrading from 2012 to 2012 R2
The network profiles for non-domain adapters will drop back to Public after the upgrade, altering the active firewall configuration.
After the upgrade install, the Windows Firewall will inherit most firewall configuration settings from the previous configuration, however the port configurations for the iSCSI Target services will be in a disabled state, preventing your iSCSI Initiators from connecting to the service.
The upgrade process will fully de-install your NIC’s, although in general most of the main configuration settings are retained and re-applied after the upgrade (IP, Net mask etc), the advanced adapter settings are not applied. In particular, and Jumbo Frame settings designed to support extended MTU’s on your SAN NIC’s will have been reset to the standard 1500 bytes. This will have a performance hit on SAN access and Hyper-V live migration performance. You should manually re-enable the Jumbo frame settings (9014 or 9000 bytes) but be aware that it will cause the NIC to drop and re-initialise when you hit apply.
A number of the SysInternals apps, for example BGInfo, that work fine under 2012 have small issues under 2012 R2. BGInfo has a recent update that makes it aware of 2012 R2 and IE 11 rather than reporting that the OS is Windows 6.2 running MSIE 9.0.11.
Ensure that any legacy WSUS 3.0 servers are patched to SP2 with KB2828185 installed. After re-synchronising, changing the product configuration and synchronising a second time that you server can update from your existing WSUS infrastructure. Be prepared for any 2012 R2 Data Center servers to report in WSUS as Windows 2000 Data Centre however!
Unfortunately you can no longer copy/paste the two cleanmgr.exe files out of WinSxS like you used to be able to do with 2008 (the store is compressed). I found that a few loops of the following will eventually remove the Windows.old upgrade cache from the root of the OS drive.
p.s. run each line manually, the above is not setup as a batch script and will ask for yes / no input. Several runs may be required.
Your desktop wallpaper will be reset to the default grey Windows Server logo, re-create as necessary
Don’t forget to activate against your KMS or enter your key.
Dell iDRAC 7 is now completely inaccessible to any of the 2012 R2 servers because IE11 is not yet supported. To run it, disable Protected mode and add the IP address of the DRAC server to the Compatibility Mode view
When Building a Windows UEFI system there are a few things to know that are different from when building an old BIOS based machine. First your USB install stick has be be formatted with FAT32 and Not NTFS. Second your UEFI motherboard probably has a Compatibility Support Module (CSM) mode that is set for BIOS compatibility. You need to turn that off if you want to enable UEFI, Secure Boot, and booting from a GPT partitioned disk.
The 11 steps for manually preparing / building a USB Disk to be a bootable Win 8.1 Install.
This bootable USB stick will work for both older BIOS installs as well as the newer UEFI installs.
1. Diskpart (Run from a CMD prompt)
2. List Disk
3. Select Disk # (Where # is the number of your USB disk)
4. Clean (removes any partitions on the USB disk, including any hidden sectors)
5. Create Partition Primary (Creates a new primary partition with default parameters)
6. Select Partition 1 (Focus on the newly created partition)
7. Active (Sets the selected partition to an active valid system partition state)
8. Format FS=fat32 quick (Formats the partition with the FAT32 file system. FAT32 is needed instead of NTFS so that it can load under the secure boot UEFI BIOS.)
9. Assign (Assigns the USB drive a drive letter)
10. Exit
11. Copy all the files from the Windows 8.1 DVD to the USB Stick.
For More information on on UEFI and Installing Windows to these machines here are some links:
For more information on UEFI BIOS and Secure Boot in Windows 8.1
http://answers.microsoft.com/en-us/windows/forum/windows8_1-security/uefi-secure-boot-in-windows-81/65d74e19-9572-4a91-85aa-57fa783f0759
Installing Windows on UEFI-based Computers
http://technet.microsoft.com/en-us/library/hh290675(v=WS.10).aspx#BootingUEFImode
First off we need to download the latest .exe for Java. I tend to get it through Oracle’s site as you get a better listing and can obtain earlier versions/the JDK (Java Development Kit) if you want it as well. Any who, Java comes in 3 flavours:
1. JDK – Java Development Kit
2. Server JRE – “Server Java Runtime Environment” Doesn’t include the web plugins but allows you to run RIA’s (Rich Internet Applications)
3. JRE – Java Runtime Environment (The stock standard app you’ll pick up to distribute on your network)
Obtain the version you require from here: http://bit.ly/jdkjre
Once you’ve chosen your flavour, accepted the license agreement and downloaded the Windows x86 Offline version “jre-7uXX-windows-i586.exe” where XX is whatever update they are up to. (~30MB) you can open the .exe with admin rights.
Once it pops up with the java installer window you will find hidden under “%userprofile%\appdata\locallow\Sun\Java” the Java .msi. You can get there by copying and pasting that into a run prompt. Copy the latest Java folder to your server share (mine was jre1.7.0_45) and don’t worry about the Deployment folder. Within this java folder is an .MSI and .cab. We now need to make a transform so the Java Update utility doesn’t annoy users.
Using either Orca or instEd to create an .MSI transform, under the property table set:
Once that’s all done and you’ve generated/saved your Transform to the network shared Java folder, load up Microsoft’s Group Policy Management console and right click on the Organisational Unit (OU) that you’ve added your network computers to and select “Create a GPO…”
Name the policy “Java 7uXX” or whatever you would like it to be named, then under:
“Computer Configuration – Policies – Software Settings – Software Installation”
right click in the right hand window, or on the software installation icon and choose “New… – Package”. Find the Java folder you put on your server and select the .MSI and choose “Advanced” as the deployment method.
Once the panel opens up, go to the Modifications tab and select Add. Locate your Transform and click Ok. The package will now be loaded into MS GPO and you can exit out of the window as it is already saved.
To delete the Start Menu icons run this script at shutdown (or startup) (.bat)
@echo off

if exist "%PROGRAMDATA%\Microsoft\Windows\Start Menu\Programs\Java" (
    rmdir "%PROGRAMDATA%\Microsoft\Windows\Start Menu\Programs\Java" /s /q
)
In terms of uninstallation download the JavaUninstall.bat file. This will uninstall Java up to version:
Uninstall Script + SuperJRE Download:
JavaUninstall.bat: http://bit.ly/jreUninstall
SuperJRE (All Java 7 updates with Transform – 439.04MB): http://www.mediafire.com/download/crlxvyq7vdceas0/SuperJRE.zip
JRE Installations per version (~30MB):
JRE 7u51.zip (MSI+CAB+Transform) : http://bit.ly/jre170_51
JRE 7u45.zip (MSI+CAB+Transform) : http://bit.ly/jre170_45
JRE 7u40.zip (MSI+CAB+Transform) : http://bit.ly/jre170_40_1
JRE 7u25.zip (MSI+CAB+Transform) : http://bit.ly/jre170_25
JRE 7u21.zip (MSI+CAB+Transform) : http://bit.ly/jre170_21
JRE 7u17.zip (MSI+CAB+Transform) : http://bit.ly/jre170_17
JRE 7u15.zip (MSI+CAB+Transform) : http://bit.ly/jre170_15
JRE 7u13.zip (MSI+CAB+Transform) : http://bit.ly/jre170_13
JRE 7u11.zip (MSI+CAB+Transform) : http://bit.ly/jre170_11
JRE 7u10.zip (MSI+CAB+Transform) : http://bit.ly/jre170_10
JRE 7u09.zip (MSI+CAB+Transform) : http://bit.ly/jre170_09
JRE 7u07.zip (MSI+CAB+Transform) : http://bit.ly/jre170_07
JRE 7u06.zip (MSI+CAB+Transform) : http://bit.ly/jre170_06
JRE 7u05.zip (MSI+CAB+Transform) : http://bit.ly/jre170_05
JRE 7u04.zip (MSI+CAB+Transform) : http://bit.ly/jre170_04
JRE 7u03.zip (MSI+CAB+Transform) : http://bit.ly/jre170_03
JRE 7u02.zip (MSI+CAB+Transform) : http://bit.ly/jre170_02
JRE 7u01.zip (MSI+CAB+Transform) : http://bit.ly/jre170_01
JRE 7u00.zip (MSI+CAB+Transform) : http://bit.ly/jre170_00
As a security best practice, it is recommended that we do not log on our computer with administrative credentials because it will otherwise increase security risks.
When we want to perform administrative tasks, we could use RUNAS to start a program using administrative accounts.
We know we can do Shift + Right Click to get RUNAS command in some of the case but for some, that is not an option, such as Active Directory management tools.
What we can do is to use command line to accomplish those tasks.
runas /user:domain\yli “mmc %windir%\system32\dsa.msc”
Of course, this applies to other .msc snap-ins.
We can then create shortcuts for these RUNAS commands on the desktop to make them handy.
In order to configure an Windows 2008 R2 Server as a time server in a non-domain environment you will need to make a number of changes to the registry. This tutorial will show you both the settings for configuring the NTP Server in addition to the client settings.
It is worth noting that this example is based on the below,
1. Enable the NTP Server
[HKEY_LOCAL_MACHINE\SYSTEM\CurrentControlSet\Services\W32Time\TimeProviders\NtpServer]”
“Enabled”=dword:00000001
1. Enable NTP Client and set polling interval.
[HKEY_LOCAL_MACHINE\SYSTEM\CurrentControlSet\Services\W32Time\TimeProviders\NtpClient]”
“Enabled”=dword:00000001
“SpecialPollInterval”=”300”
2. Configure the NTP Time Source, period and frequency
[HKEY_LOCAL_MACHINE\SYSTEM\CurrentControlSet\Services\W32Time\Parameters]
“NtpServer”=”[NTP SERVER IP],0x1”
“Type”=”NTP”
“Period”=”freq”
By default the w32tm service will not automatically start if your Windows machine is not on a domain. To ensure that the service starts automatically run the following command :
sc triggerinfo w32time start/networkon stop/networkoff
To confirm that your clients are correctly peering with your time source run the following command.
w32tm /query /peers
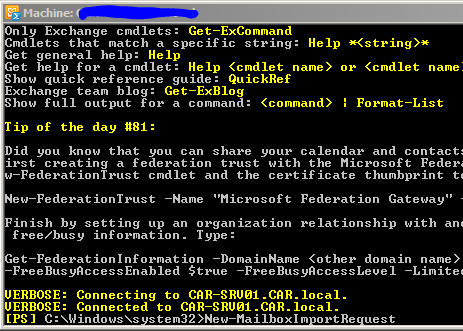
Exchange Server 2010 Service Pack 1 introduced a new method for exporting mailboxes called Mailbox Export Requests. This new method replaces the previous Export-Mailbox command.
Before we look at how to create a new mailbox export request in Exchange 2010 SP1 there are a few things that you should understand.
Firstly, no accounts are granted the rights to export mailboxes by default. You need to explicitly grant these rights, even to accounts that are organisation administrators.
Secondly, the mailbox export request is processed by the Client Access server role. Because multiple Client Access servers can exist in a site the request could be processed by any one of them. To ensure that the path to the export PST file is valid for any Client Access server it has to be a UNC path to network share, not a local path.
The first step is to grant the right to export mailboxes to an account in your organization. In the Exchange Management Shell run the following command.
New-ManagementRoleAssignment –Role "Mailbox Import Export" –User Administrator
If you’re logged with that user already simply restart your Exchange Management Shell session to be granted access to the new cmdlets.
Next we need to create the network share that will be used as the file path for the exported PST files. All that is required here is a network share that the Exchange Trusted Subsystem group has read/write permission to.

With everything configured properly we can now use New-MailboxExportRequest to start the mailbox export. The only two required parameters for the command are the file path to the export PST file, and the name of the mailbox to export.
[PS] C:\>New-MailboxExportRequest -Mailbox alan.reid -FilePath \\esp-ho-ex2010a\pst\alan.reid.pst

Name                                           Mailbox                                        Status
----                                           -------                                        ------
MailboxExport                                  exchangeserverpro.net/Company/Users/Head Of... Queued
To view the status of the request use the Get-MailboxExportRequest cmdlet.
[PS] C:\>Get-MailboxExportRequest

Name                                           Mailbox                                        Status
----                                           -------                                        ------
MailboxExport                                  exchangeserverpro.net/Company/Users/Head Of... InProgress
You can also see more detail about the mailbox export request with Get-MailboxExportRequest.
[PS] C:\>Get-MailboxExportRequest -Name MailboxExport | fl

RunspaceId     : c48a9069-e572-4c65-80ea-773e61e5337e
FilePath       : \\esp-ho-ex2010a\pst\alan.reid.pst
SourceDatabase : MB-HO-01
Mailbox        : exchangeserverpro.net/Company/Users/Head Office/Alan.Reid
Name           : MailboxExport
RequestGuid    : 9de3a722-0c82-4e34-98bf-0ff624c47c16
RequestQueue   : MB-HO-01
Flags          : IntraOrg, Push
BatchName      :
Status         : InProgress
Protect        : False
Suspend        : False
Direction      : Push
RequestStyle   : IntraOrg
OrganizationId :
Identity       : exchangeserverpro.net/Company/Users/Head Office/Alan.Reid\MailboxExport
IsValid        : True
An easy way to see the progress of all mailbox export requests is to pipe Get-MailboxExportRequest into the Get-MailboxExportRequestStatistics cmdlet.
[PS] C:\>Get-MailboxExportRequest | Get-MailboxExportRequestStatistics

Name                                   Status                    SourceAlias                           PercentComplete
----                                   ------                    -----------                           ---------------
MailboxExport                          InProgress                Alan.Reid                             20
You can also export a user’s Personal Archive using mailbox export requests simply by adding the -IsArchive parameter to the command.
[PS] C:\>New-MailboxExportRequest -Mailbox alan.reid -FilePath \\esp-ho-ex2010a\pst\alan.reid.pst -IsArchive
When a mailbox export request is completed it remains on the server until it is removed by an administrator usingRemove-MailboxExportRequest.
To see all of the completed mailbox export requests run this command.
[PS] C:\>Get-MailboxExportRequest | where {$_.status -eq "Completed"}

Name                                           Mailbox                                        Status
----                                           -------                                        ------
MailboxExport                                  exchangeserverpro.net/Company/Users/Head Of... Completed
And to clear all completed mailbox export requests from Exchange run the following command.
[PS] C:\>Get-MailboxExportRequest | where {$_.status -eq "Completed"} | Remove-MailboxExportRequest
Now, when you run the command you will see that it is “Queued”

To see the status of the import run Get-MailboxImportRequestStatistics -Identity MailboxMailboxImportName where ‘mailbox’ is the user account from the image above and ‘MailboxImportName’ is the name above. So for example my command looked like

You have AD with Recycle Bin enabled.
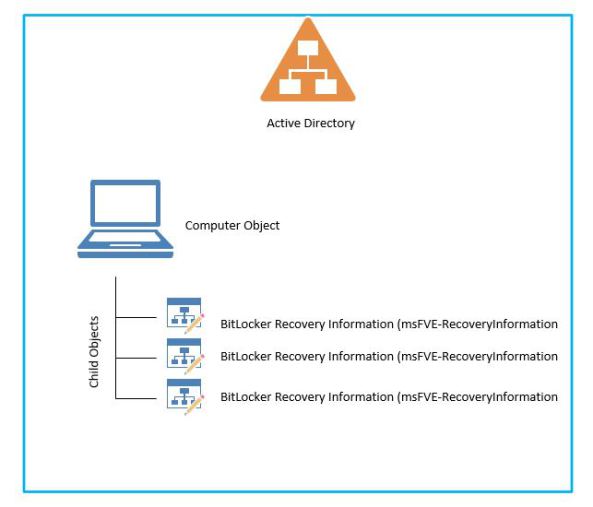
You are storing BitLocker recovery keys in AD
You have deleted a computer object with BitLocker Recovery information on it
You then restored that computer account from recycle bin.
No BitLocker Recovery information exists on the recovered computer object !!!!! What the heck ?!
Going back to basics…. do you know where the BitLocker information is stored for a computer object ? They are stored as a child object below the computer object itself.
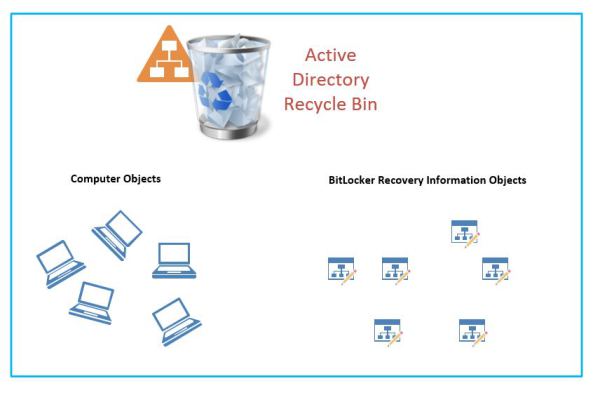
Now, when the computer get deleted from Active Directory and moved to the AD recycle bin, the links between the child objects and the parent are broken. In the AD recycle bin you will see both computer objects and child objects randomly stored there. If you put your hand in this recycle bin and pull a computer object, you will not see any of its child objects attached to it any more. This is exactly what happened when you restored the AD computer from recycle bin, you will get the computer object without its child objects.
Lucky for all of us, each child objects of type (BitLocker Recovery Information) will have an attribute called (lastKnownParent). So theoretically if you go to the recycle bin and asked ” i have a parent called ComputerX, so which of you guys are the sons of this computer (which of you has the lastknownParent = ComputerX).
Go to your Domain Controller or any machine with ActiveDirectory PowerShell Module, open PowerShell using a domain administrator account (only domain admin can restore from AD recycle bin), run the script from there. Make sure AD PowerShell module exist on that machine.
Do not forget that you may need to run Set-ExecutionPolicy Unrestricted on PowerShell to allow script execution.
I have no single credit writing this script. You can find the script here written by (Norman Bauer). I have also copied the script to my repository so you can download it directly .
Download the script BitLockerInfo_From_RecycleBin
You have BitLocker deployment where you backup your BitLocker recovery key to Active Directory.
When you format a computer, you go to AD, delete the computer account, and create a new one, then you join the formatted machine to domain! Killer mistake indeed!!!
When you format a computer, you go to AD, (RESET THE COMPUTER ACCOUNT) , and then join the formatted machine to machine!
When you enable BitLocker on a computer drive, the machine will write BitLocker Recovery information on the computer account in AD. So if you delete a computer account, you will delete all BitLocker recovery information. Instead resetting computer account will not.
A computer with C and D drive with BitLocker enabled on both of them. You backed up everything in the C drive and since the C drive is big enough, you decided to keep the D and only format the C drive.
You start installing Windows 8 for example on the C drive, you deleted the computer account from AD, and then you created a new one. Then you join the machine to domain, and enable BitLocker on the C drive.
Now you noticed the D drive is encrypted. You went to AD to find a recovery information for that drive. BOOOOM!!! no recovery information since you deleted the computer account and created a new one. Good luck with that.
Remember to always reset computer accounts instead of the old habit of deleting them