dig for Windows 8, 7, Vista, XP, 2000 


(dig is a powerful tool to investigate [digging into] the DNS system)
Source of the binary is from ftp.isc.org
Manual Page of dig, in the cryptic Unix style, for reference only.
(1) Download:
dig version 9.3.2
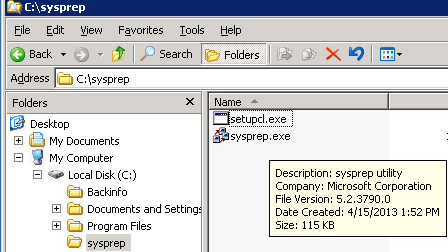
Create a folder c:dig
Download dig-files3 and save it to c:dig
Use Open source 7-zip to extract all the files inside dig-files3.zip to c:dig
Note: If msvcr70.dll already exists in %systemroot%system32 , then you can delete c:digmsvcr70.dll
Note: Included in dig-files*.zip is a command line whois, version 4.7.30:
The canonical site of the whois source code is http://ftp.debian.org/debian/pool/main/w/whois/
The whois.exe file inside dig-files*.zip is compiled using cygwin’s gcc-mingw compiler.
(2) File integrity check (reason: some stupid anti-virus programs mis-identify certain dll files as virus and destroy them without giving warnings)
Windows XP and Windows 2000: Click Start.. Run … type CMD
Windows Vista and Windows 7: Click … type CMD
cd c:dig
sha1sum *
You should see the SHA1 hashes (SHA1 hash is used as an integrity check, similar to the legacy checksum idea).
Compare your hashes with the following table.
C:dig>sha1sum *
489a8ca7c7851088ade58c404ddde1a926559003 cygwin1.dll
57487baeaa0eb2848557b7ca54ed9183eafc73fa dig.exe
97dbd755d67a5829c138a4708be7a4f26ed0894c host.exe
d22e4b8956e1831ff0f9d07620ec19bf171f0c29 libbind9.dll
81588f0be7d3c6b320edc314532d9f2d0a105594 libdns.dll
e0bd7187bbc01003abfe7472e64b68cd1bdb6bab libeay32.dll
f445362e728a902796ec6871a79c6307054974e4 libisc.dll
b3255c0e4808a703f95c217a91ffcd6940e680c9 libisccfg.dll
dfbde4f9e25fd49a0846e97fd813d6876dc94067 liblwres.dll
61b8f573db448ae6351ae3475c2e7c482d81533c msvcr70.dll
da39a3ee5e6b4b0d3255bfef95601890afd80709 resolv.conf
4a578ecd09a2d0c8431bdd8cf3d5c5f3ddcddfc9 sha1sum.exe
9d9ec0e2cf59e14d9db618d10b55b881bb7d195b whois.exe |
If your hashes are the same as the above table, then your files pass the integrity check.
Type exit to close the black screen.
(3) Installation and setup:
Windows Vista Windows 7 
Install a Vista Powertoy utility:
File name: CmdHereAsAdmin (right click the link, choose save; then on your local copy, right click the .inf file, choose Install)
(Thanks to Aaron Spurlock of Ogden, UT, USA and Patryk Bratkowski for their contributions)
Click …click Computer, click C:
right click on c:dig , choose Cmd Prompt Here As Administrator
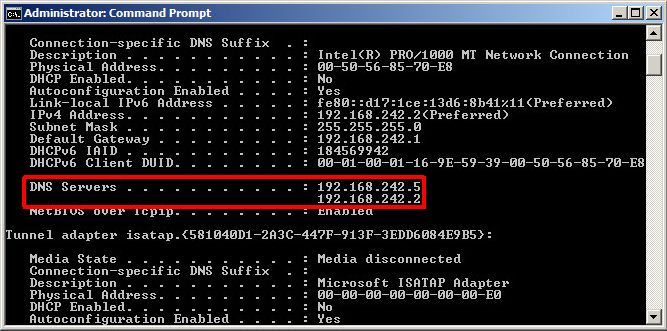
copy resolv.conf %systemroot%system32driversetc
Windows XP Windows 2000
Click start…run… type cmd
cd c:dig
copy resolv.conf %systemroot%system32driversetc
(4) Add path:
(thanks to Jason Partridge of Akento Technology Sourcing, Bloomington, IN, USA for his contribution)
Windows 7: Click … type environment variables … choose “edit environment variables for your account“
Windows Vista: Click …click Control Panel, in the Search Box, type environment variables … choose “edit environment variables for your account”
Windows XP : Click..Start…click Control Panel …in Category “Performance and Maintenance“, System, Advanced, Environment Variables.
Windows 2000 : right click My Computer icon, choose properties, Advanced, Environment Variables.
Look in the top half of the screen, “User variables” section.
If a PATH variable exists, double click the variable PATH to enter edit mode,
append ;c:dig to the Variable value.
If the PATH variable does not exist, click the New button,
Variable name: PATH
Variable value: c:dig
How to use dig to query the DNS system:
You can also use dig to help setting up your security camera system. First add a “A record” to your name server to point the “A record” of your chosen domain to an ip address. Make sure that the “A record” points to an ip address of your dvr recorder’s external ip address (or the D-Link/Linksys router that sits in front of your security device). If all is good and you have the necessary ports open or forwarded, you should be able to remotely access your security system over a network of Internet.
Windows Vista/Windows 7: Click … type cmd
Windows XP/Windows 2000 : Click Start… Run… type cmd
dig –help will show you a “help screen” to intimidate and confuse you.
dig -h will show you a even more intimidating “help screen”.
dig ns . will show you the 13 “root-level name servers”, these are the 13 Internet gods.
dig com. NS
shows you the (gTLD) top level domain name servers controlling the .com domain
dig net. NS
shows you the (gTLD) top level name servers controlling the .net domain
dig org. NS
shows you the (gTLD) top level name servers controlling the .org domain
dig gov. NS
shows you the (TLD) top level name servers controlling the .gov (US Government) restricted domain
dig mil. NS
shows you the (TLD) top level name servers controlling the .mil (US military) restricted domain
dig edu. NS
shows you the (TLD) top level name servers controlling the .edu (US post secondary) restricted domain
dig int. NS
shows you the (TLD) top level name servers controlling the .int (international treaties) restricted domain
Each country code has its authoritative name servers (below is some of the 244 ccTLD)
dig ca. NS
shows you the top level name servers controlling the .ca (Canada  ) domain
dig us. NS
shows you the top level name servers controlling the .us (US  ) domain
dig uk. NS
shows you the top level name servers controlling the .uk (United Kingdom  ) domain
dig de. NS
shows you the top level name servers controlling the .de (Germany  ) domain
dig au. NS
shows you the top level name servers controlling the .au (Australia  ) domain
dig cn. NS
shows you the top level name servers controlling the .cn (China  ) domain
dig kr. NS
shows you the top level name servers controlling the .kr (Korea  ) domain
dig tw. NS
shows you the top level name servers controlling the .tw (Taiwan  ) domain
dig hk. NS
shows you the top level name servers controlling the .hk (Hong Kong  ) domain
dig gs. NS
shows you the top level name servers controlling the .gs (South Georgia and the South Sandwich Islands  ) domain
dig ws. NS
shows you the top level name servers controlling the .ws (Western Samoa  ) domain,
some “domain registrars” confuse the public by inferring this domain as the “Website” top level domain.
dig tv. NS
shows you the top level name servers controlling the .tv (Tuvalu  ) domain,
some “domain registers” confuse the public by inferring this domain as the “Television” top level domain.
dig ae. NS
shows you the top level name servers controlling the .ae (United Arab Emirates  ) domain
dig gr. NS
shows you the top level name servers controlling the .gr (Greece  ) domain
dig id. NS
shows you the top level name servers controlling the .id (Indonesia  ) domain
dig ru. NS
shows you the top level name servers controlling the .ru (Russia  ) domain
dig aero. NS
shows you the (gTLD) top level name servers controlling the .aero domain (for aviation industry)
dig biz. NS
shows you the (gTLD) top level name servers controlling the .biz domain (for businesses)
dig coop. NS
shows you the (gTLD) top level name servers controlling the .coop domain (for co-op associations)
dig info. NS
shows you the (gTLD) top level name servers controlling the .info domain
dig jobs. NS
shows you the (gTLD) top level name servers controlling the .jobs domain (for human resources)
dig mobi. NS
shows you the (gTLD) top level name servers controlling the .mobi domain (for mobile products and services)
dig museum. NS
shows you the (gTLD) top level name servers controlling the .museum domain (for museums)
dig name. NS
shows you the (gTLD) top level name servers controlling the .name domain (for individuals)
dig pro. NS
shows you the (gTLD) top level name servers controlling the .pro domain (for credentialed professionals)
dig travel. NS
shows you the (gTLD) top level name servers controlling the .travel domain (for travel industry)
The Internet god approved these gTLD domains.
As of 2008, the Inernet god has changed its policy, anyone who can afford to pay lots of money each year can administer any name as a top level name.
In addition, non-Latin scripts are allowed.
More examples of how to use dig to query the DNS system:
dig dell.com. NS
shows you the Name Servers for “dell.com”
dig dell.com. MX
shows you the mail servers for receiving email for the “dell.com” domain (geeky terminology: Mail eXchange ).
The mail server with the smallest number in front of it will be contacted first. If that mail server is down or busy,
the mail server with the larger number will be contacted next (for fault tolerant).
dig www.dell.com.
shows you the IP address of the computer www.dell.com (geeks call computer a “host“)
(geeks also like to call www.dell.com a FQDN to intimidate others around them)
Sometimes you see the word CNAME in the answer section, CNAME is a geeky way of saying “an alias“.
dig www.ibm.com. @hub.ubc.ca
lookup the IP address of www.ibm.com by making a DNS query to the DNS server “hub.ubc.ca”
Most DNS name servers are recursive (friendly), they try to find an answer for you.
However, some “system administrators” suffering from extreme-paranoia configure their name servers to
refuse answering queries that are outside of their “comfort zones”.
These extreme-paranoia servers are called “non-recursive” (aka unfriendly) name servers.
dig -x 216.21.128.22
will look up the “host name” from an IP address
(geeks call this a “reverse DNS lookup” to intimidate and impress others around them)
The equivalent human-friendly command is
host 216.21.128.22
dig www.ibm.com. +trace
will give you some DNS server performance data.
dig vs whois
The DNS system and the whois system are not the same, they are only loosely tied together.
If the whois system is broken, (while the DNS system is working) the whole Internet will work fine.
If the DNS system is broken (while the whois system is working), the whole Internet will die.
The whois system is supposed to display who owns the domain and their corresponding name servers,
however, due to usually defective software at whois servers at domain registrars,
(the amount of defects is proportional to the registrar’s domain registration fees),
the DNS name servers information obtained from the whois query is often wrong, out of date, and inaccurate.
Use whois to find out approximately who owns the domain.
Use dig to lookup the DNS name servers of that domain.
For example, to find out who owns the name ibm.com
whois ibm.com
or
whois ibm.com | more (hit space bar to scroll forward)