Convert a Server Core Installation to Gui

Step 1

If the server is a physical computer, then insert the Windows Server 2012 Operating System Disc into the DVD drive (D: in this example)

If the server is a virtual machine, then first step is to mount a Windows Server 2012 source ISO image to the VM or insert a Windows Server 2012 DVD in the DVD drive of the host machine and attach it to the VM running Windows Server 2012 Server Core as shown below:

ServerCoreTOWinGUI-and-back1

Step 2

At the command prompt type:

mkdir c:\mount

Issue the following command and press Enter:

dism.exe /mount-image /ImageFile:d:\sources\install.wim /Index:4 /Mountdir:c:\mount /readonly

Start Windows Powershell by typing the following command:

Powershell.exe

From the Windows Powershell prompt issue the following commands and press Enter after each:

Import-Module ServerManager
Install-WindowsFeature –IncludeAllSubFeature User-Interfaces-Infra –Source:c:\mount\windows

ServerCoreTOWinGUI-and-back2

Step 3

When prompted, restart the server and logon as Administrator to verify the installation of the GUI components:

Shutdown /r /t 0

Verify that the GUI components appear

ServerCoreTOWinGUI-and-back3


ServerCoreTOWinGUI-and-back4

Step 4

To convert a Windows Server 2012 Full Installation to a Server Core Installation, open Windows Powershell and issue the following commands:

Import-Module ServerManager
Uninstall-WindowsFeature User-Interfaces-Infra

ServerCoreTOWinGUI-and-back5

Wait for the removal to complete:

ServerCoreTOWinGUI-and-back6

Step 5

Restart by issuing the following command:

Shutdown /r /t 5

The following screen appears:

ServerCoreTOWinGUI-and-back7


ServerCoreTOWinGUI-and-back8


ServerCoreTOWinGUI-and-back9


The server restarts with Server Core features.

Configuring iSCSI MPIO on Windows 2008 Server

We have recently gone through the process of wiping out our lab and rebuilding from scratch on Windows Server 2008 R2 Enterprise.  During this process, I recorded the steps I used to configure MPIO with the iSCSI initiator in R2.  Just to make life more complex, our servers only have 2 NICs, so I am balancing the host traffic, virtual machine traffic, and MPIO across those two NIC devices.  Is this supported?  I seriously doubt it.  🙂  In the real world you would separate out iSCSI traffic on dedicated NICs, cables, and separate switch paths.  The following step-by-step process should be relatively the same though.

Editorial Note: I do not work for the iSCSI team, I’m a field guy.  If you see something you disagree with here don’t be angry, instead comment your point and I will update the article.  Thanks.

Foundation

The workflow I am following assumes that when starting out one NIC is configured for host traffic and the other for a VM network.  On the WSS the secondary NIC was already configured not to register in DNS.  Also, since I am using WSS and the built-in iSCSI Target I don’t have to configure a DSM for the storage device.  If your configuration is different than that, you may have to ignore or add to a few parts of the below instructions.  Sorry about that.  I can only document what I have available for testing…

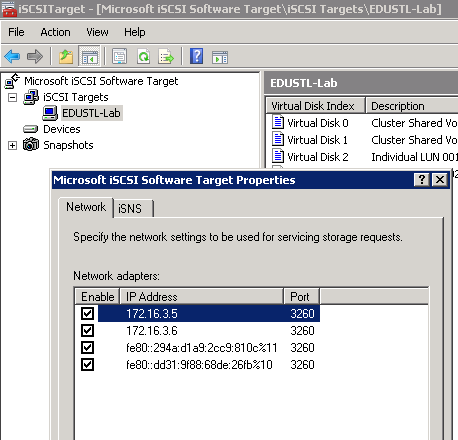
First I just want to show a screenshot of the iSCSI target on our Windows Storage Server, to indicate that it does have two IPs.  Once again, I am cheating the system here.  These are not dedicated TOE adapters for iSCSI on a separate network.  This is a poor man’s environment with 1 VLAN and minimal network hardware.  My highly available environment is anything but!  To view this information on your own WSS, right-click on the words “Microsoft iSCSI Software Target” and click Properties.

image_2

Enable the MPIO Feature on the initiating servers

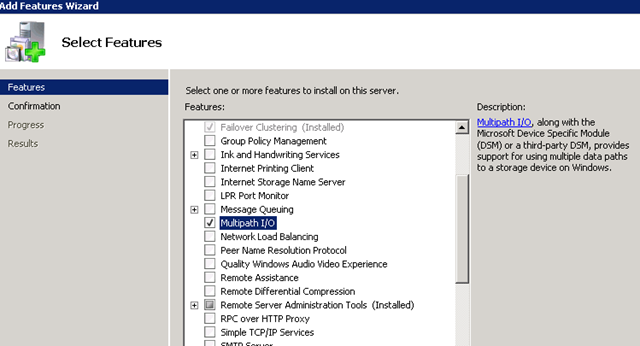
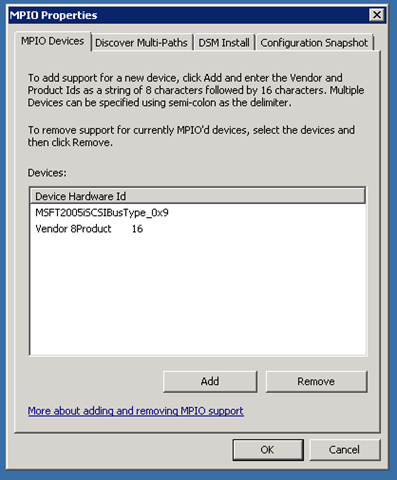
Next I needed to enable MPIO on the servers making the iSCSI connections.  MPIO is a Feature in Server 2008 R2 listed as Multipath I/O.  Adding the Feature did not require a reboot on any of my servers.

image_4

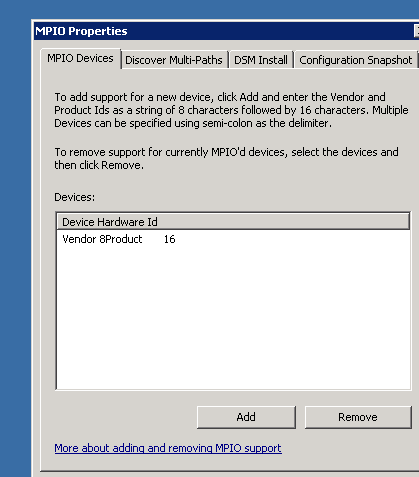
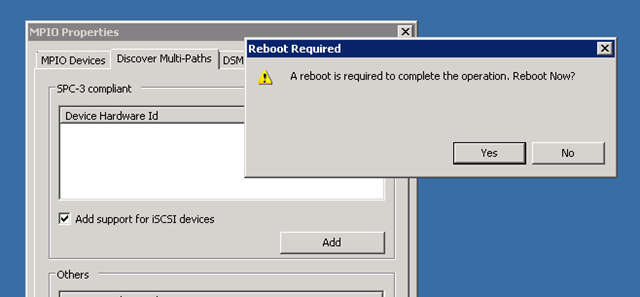
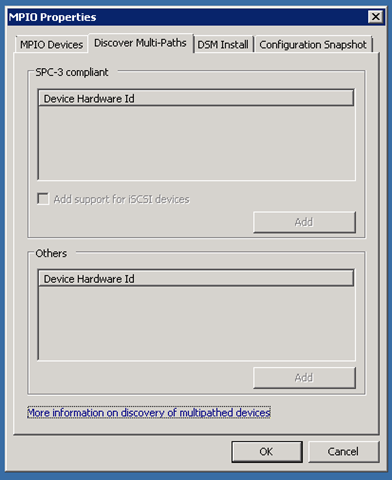
Configuring MPIO to work with iSCSI was simple.  Click Start and type “MPIO”, launch the control panel applet, and you should see the window below.  Click on the Discover Multi-Paths tab, check the box for “Add support for iSCSI devices”, and click Add.  You should immediately be prompted to reboot.  This was consistent across 4 servers where I followed this process.

image_6


image_8

After rebooting, if you open the MPIO Control Panel applet again, you should see the iSCSI bus listed as a device.  Note on my servers, the Discover Multi-Paths page becomes grayed out.

image_10 image_12

Check the IP of the existing connection path

Now click Start and type “iSCSI”.  Launch the iSCSI Initiator applet.  Add your iSNS server or Target portal.  There is plenty of documentation on how to do this on TechNet if you need assistance. I want to stay focused on the MPIO configuration.

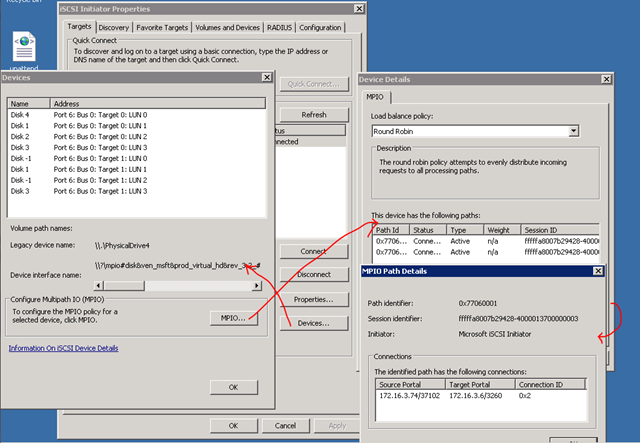
Once you are connected to the target, click the button labeled “Devices…”.  You should see each of the volumes you have connected listed in the top pane.  Select a Disk and click the MPIO button.  In the Device Details pane you should see information on the current path and session.  If you click the Details button, you can verify the local and remote IPs the current connection is using.  It should be the IPs that resolve from the hostnames of each server.  See my remedial diagram below.

I recommend taking note of this IP, to make life easier later on!

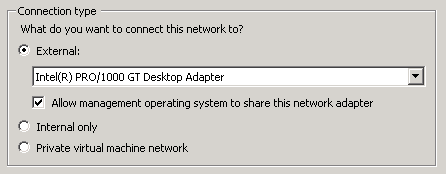
So everything is setup for MPIO but you are only using a single path and that’s not really going to accomplish much now is it?  Since I only have 2 NICs in my test server I need my host to share the second NIC with the VM network.  This is not ideal but again I am using what I have and this is only a test box.

image_14

Setting a second IP on my hosts

In R2 the host does not communicate by default on a NIC where a virtual network is assigned.  To change this, open the Hyper-V console and click “Virtual Network Manager…”.  Check the box “Allow management operating system to share this network adapter”.

image_16

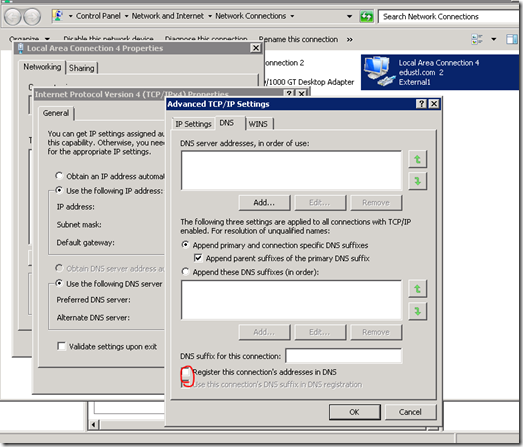
This will create a third device in the network console (to get there click Start, type “ncpa.cpl”, and launch the applet).  You should see the name of the new device matches your Virtual Network name.  In my case Local Area Connection 4 has a device name “External1”.  Right click on the connection and then click Properties.  Select “Internet Protocal Version 4 (TCP/IPv4)” and click the Properties button.  Configure your address and subnet but not the gateway as it should already be assigned on the first adapter.  You also shouldn’t need to set the DNS addresses in the new adapter.  You will however, want to click the “Advanced…” button followed by the DNS tab and uncheck the box next to “Register this connection’s address in DNS”.  This really should be the job of your primary adapter, no need to have multiple addresses for the same hostname registering and causing confusion unless you have a unique demand for it.

image_thumb_8

Add a second path

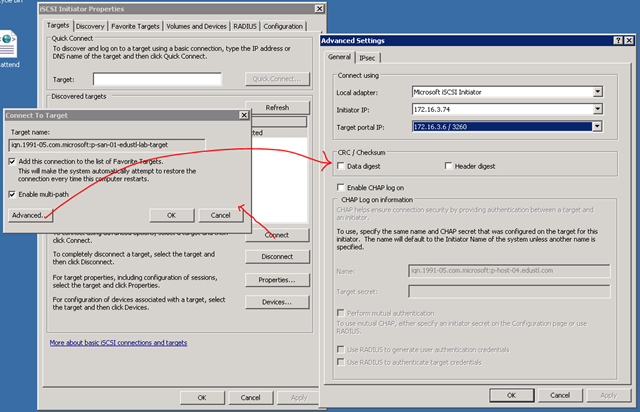
Back in the iSCSI Initiator Applet, click the Connect button.  I know you already have a connection.  In this step we are adding an additional connection to the Target to provide a second path.

In the subsequent dialogue make sure you check the box next to “Enable multi-path” and then click the Advanced… button.  In the Advanced Settings dialogue you will need to choose the IP for your second path.  In the drop-down menu next to “Local adapter:” select Microsoft iSCSI Initiator”.  In the drop-down next to “Initiator IP:” select the IP on your local server you would like the Initiator to use when making a connection for the secondary path.  In the third drop-down, next to “Target portal IP:” select the IP of the iSCSI Target server you would like to connect to.  This should be the opposite IP of the session we observed a few steps back when I mentioned you should take note of the IP.

image_20

Check your work

image_22

Just one more step.  Let’s verify that you now have 2 connections available for each disk, that they are using separate paths, and have the opportunity to choose the types of load balancing available.  Once you have hit OK out of each of the open dialogues from the step above, click on the Devices… button again and check out the top pane.  On each of my servers I see each disk listed twice, once per Target 0 and once per Target 1, as seen below.  If you follow my remedial diagrams one more time and select a disk, then the MPIO button, you should now see two paths.  Select the first path and click the Details button.  It should be using the local and remote IPs we took note of earlier.  Click OK.  Now select the second path and then the Details… button.  You should see it using the other adapter’s IP on BOTH the local and remote hosts.

IMPROVING HYPER-V PERFORMANCE AND THROUGHPUT

GENERAL GUIDELINES TO IMPROVE HYPER-V SPEED AND ACHIEVE HIGH SYSTEM PERFORMANCE

  • Don’t use dynamically expanding VHDs or VHDXs. These are only meant for test systems and are not recommended for production systems by Microsoft.
  • Don’t use Hyper-V snapshots. These are also only for test and development purposes and not recommended by Microsoft for production use.
  • Use large NTFS cluster sizes, such as 64K.
  • Do not use drive compression of any kind.
  • Use a separate drive for the Windows paging file
  • Defragment all drives regularly, including from within the virtual machine operating system
  • Use fixed sized VHDs with plenty of free space for the VM operating system
  • Have at least 10 to 20% free space on every disk on the host. NTFS and VSS quickly become inefficient when disk space is below that limit.
  • Keep at least 1 GB free RAM on the host
  • Increase the VSS storage size allocation limits for each drive to at least 10% of each drive’s size. Command: vssadmin resize shadowstorage
  • Increase the Windows paging file size to at least 2.5x the RAM size. Use the same setting for minimum and maximum. Ensure the paging file is not fragmented
  • Make sure your system isn’t clogged with orphaned VSS snapshots. (Command: vssadmin list shadows)

GENERAL HARDWARE RECOMMENDATIONS TO IMPROVE HYPER-V SPEED

  • Use high RPM drives
  • Use striped RAID for virtual hard drive storage
  • Use USB 3 or eSATA for external backup drives
  • Use 10 Gbit Ethernet if possible for network traffic
  • Isolate backup network traffic from other traffic.
  • Use separate disks for VMs with high I/O requirements
  • Increase the VM’s RAM
  • Increase the host’s RAM. Always keep at least 1 GB available on the host

CLUSTER SHARED VOLUME RECOMMENDATIONS TO IMPROVE HYPER-V SPEED

  • Try all the steps shown above first
  • If using a cluster shared volume, traffic isolation is very important.
  • Use separate NICs for SAN, backup, and cluster management traffic.
  • Use 10 Gbit Ethernet if available
  • Separate busy VMs into separate volumes
  • Add additional nodes to spread the load
  • Pick a time for backup when the network traffic is low.
  • Disable NetBIOS over TCP/IP
  • Enable jumbo packets
  • Use high quality network switches
  • Keep the LANs short and connect only a few nodes to each CSV. I.e. split large setups into separate CSVs
  • Don’t use several switches on a Ethernet bus because each of them adds latency

BACKUP SETTINGS TO INCREASE HYPER-V BACKUP SPEED

On most systems administrators generally want to keep the Hyper-V backup process in the background so it has little if any impact on the overall system. Since most Hyper-V hosts are active 24/7, there is hardly ever a time to shut down virtual machines for the maintenance.

However, there are time windows, usually at night, where a backup process could be given additional system resources and finish faster, at the cost of a minor system slowdown.

Install Hyper-V on Server Core

Get your server all setup, with a static IP, fully patched, on the domain, Etc, and ready to install hyper-v

from there issue the following command to get into Server Config:

sconfig

sconfig

Install Hyper-V With the following Command:

dism /online /enable-feature /FeatureName:Microsoft-Hyper-V

DISM_Install

from there, BAM, Hyper-V is installed, go ahead and reboot, and connect with Either SCVMM, or Hyper-V Manager from a remote console

Disable Windows Firewall on Server Core

Most Sysadmins will look this up second as soon as they get the server installed, or pretty close.

Open powershell/command window

Powershell1

issue the following command:

netsh advfirewall set allprofiles state off

Powershell2

once you see the letters OK, you are good to go (remember to reboot, it’s windows)

Samba: How To Share Files For Your LAN Without User Authentication

This tutorial will show how to set samba to allow read-only file sharing for your LAN computers as guest (without be prompted for a password).
Because users won’t be prompted for a user/password, this tutorial is meant to be installed in a LAN where all host are to be trusted.

There is many advantages of sharing files in a LAN. For instance, when you have a multimedia box (playing music, movies….) it is great to be able to access the music on that box from any machines in your LAN.

Let’s get started. In the first place, you need to have samba installed.

$sudo apt-get install samba

Because we are going to make samba security insecure, make sure only your local network can access samba service. To do so, open and edit /etc/samba/smb.conf

$sudo vi /etc/samba/smb.conf

and set interfaces to lo and your local network interface. In my case: eth1.

interfaces = lo eth1
bind interfaces only = true
Now, it is time to smoothen samba default security by changing the security variable: security and make sure it is set to share instead of user and that guest account is enabled:

security = share


guest account = nobody
Now, we can create a share to be accessible to guest users:

[Guest Share]
comment = Guest access share
path = /path/to/dir/to/share
browseable = yes
read only = yes
guest ok = yes
You can now test that your configuration is good using testparm:

$ testparm

If everything is fine, it is time to reload samba service to have your new configuration taken into account:

$sudo /etc/init.d/samba reload

That’s it, anybody in your LAN can now access your share.

Time services on Domain Controllers

Several times now I have seen issues where the local domain controllers can loose their time accuracy. I think there are several reasons for this, most notably is where the Domain Controller is a virtual machine.

To fix the time service in Server 2008R2 – 2012R2 – 2016 use the following command prompt:


net stop w32time
w32tm /config /syncfromflags:manual /manualpeerlist:oceania.pool.ntp.org
w32tm /config /reliable:yes
net start w32time
w32tm /query /configuration

This forces the Domain controller to both sync against an outside time source as well as advertising to the network that it is a reliable time source.